Material to Image Promting
- Material to Image Promting
- 1. Project Idea
- 2. System Structure
- 3. Preparation
- 4. Step by Step Instructions
- 5. Further explorations
- 6. Related Links:
- 7. Related Projects
1. Project Idea
“Text-to-image” prompts with AI are now a familiar concept to us. But what might a generated image look like if we stretch a piece of fabric—in other words, a “material-to-image” prompt? What possibilities and limitations does this experiment reveal?
In the following, we'll hack an image AI (Stable Diffusion), connect it to an analog sensor input, and use the sensor data in our prompt.
Info: What is Stable Diffusion and how does it work?
Stable Diffusion is an AI model for generating images from text descriptions (text-to-image). Stable Diffusion is based on the principle of diffusion: An image is initially treated as pure noise; the AI then “removes” this noise step by step, using the input text as a guide. The model was trained on massive image-text datasets.
Unlike many other AI tools, Stable Diffusion is open-source and free to use, and it runs locally on your computer (with a GPU) or in the cloud. For this project we will use the local web interface AUTOMATIC1111.
To give some context, here is a comparison of two popular image AIs:
| Feature | Stable Diffusion | Midjourney |
|---|---|---|
| Model Type | Open Source | Proprietary (Closed Source) |
| Platform | Local installation or Cloud (e.g., RunPod) | Cloud-based (via Discord or Web) |
| Ease of use | Steep learning curve (Technical) | Very High (Plug & Play) |
| Cost | Free (Software), but requires hardware | Monthly subscription ($10 – $120) |
| Hardware | Powerful GPU required (NVIDIA 8GB+ VRAM) | None (runs on their servers) |
| Costumazation | Maximum (Extensions, LoRAs, ControlNet) | Low (only via Prompts/Parameters) |
| Privacy | Fully private (Local) | Public by default (unless Pro plan) |
| Censorship | No filters (on local versions) | Strict safety filters |
| Aesthetic | Neutral / Highly adaptable | Artistic "Opinionated" Style |
2. System Structure
Sensor → Arduino → Python Script → AUTOMATIC1111 WebUI API → Stable Diffusion (.ckpt) → PyTorch Engine
- Sensor = physical sensor measures a physical interaction/parameter (light, approximation, distance, ...).
- Arduino = reads the analog signal from the sensor and converts it into digital data. It then sends this data via serial communication to your laptop.
- Python Script = Python program receives the Arduino data and interprets it. It applies thresholds or rules (e.g., “if stretch > X, trigger an action”) to influence our prompt for the image.
- AUTOMATIC1111 WebUI API = When the condition is met, the Python script sends the prompt to the AUTOMATIC1111 Stable Diffusion WebUI API.
- Stable Diffusion (.ckpt)= The API uses a Stable Diffusion model (stored as a .ckpt file) to generate images based on the input prompt or parameters. The checkpoint (.ckpt) contains the learned parameters (weights). It functions like the “memories and learned knowledge” of a human brain.
- PyTorch Engine = Stable Diffusion runs on PyTorch, which handles the deep learning computations required to generate the image. Analogous it stands for the “brain structure”.
3. Preparation
#3.1 Technical requirements
This instruction is especially for Apple Mac. Of course it is possible with other operating systems as well.
For this project you need a laptop with an Apple M1 chip or higher and at least 16GB RAM. Check your memory capacities like this:
- click cmd + space
- search for Activity Monitor (DE: Aktivitätenanzeige) and enter/open
- click the memory tab
- check amount of Memory used. It is recommended to have around 8 GB memory available, which results in max 8GB Memory used. Try to close apps and programs you do not use to reach this.

#3.2 Please follow this updated installation
https://stable-diffusion-art.com/install-mac/#Install_AUTOMATIC1111_on_Mac
After the installation type a prompt and click "Generate". If this works, you can continue with chapter 4.2. Arduino Set-up.
#3.3 Create the following folder structure in your Finder
- Material to Image
- Arduino
- Python
- threshold
- generated_images
- Project2
- generated_images
- Project
- generated_images
- threshold
- Stable Diffusion
#3.4 Downloads
3.4.1 Install Python software and save in your Python folder.
Note
Please DO NOT install the latest version BUT any version of 3.10.
Stable Diffusion uses PyTorch, which is often not compatible with the latest Python versions and therefore results in installation errors.
Info
PyTorch is an open-source library for AI and machine learning that is used with Python. It is primarily used for neural networks and deep learning. One could say PyTorch is the “computational engine” that powers AI models like Stable Diffusion.
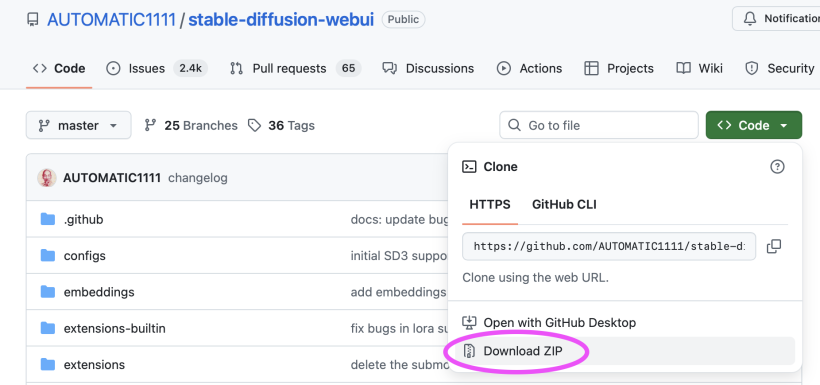
3.4.2 Install the user web interface AUTOMATIC1111: click green code button, click download zip. Unzip file as stable-diffusion-webui-master in your Stable Diffusion folder.
3.4.3 Look for the webui-user.sh file in this folder and open it. Add the following code line at the bottom and close the window again.
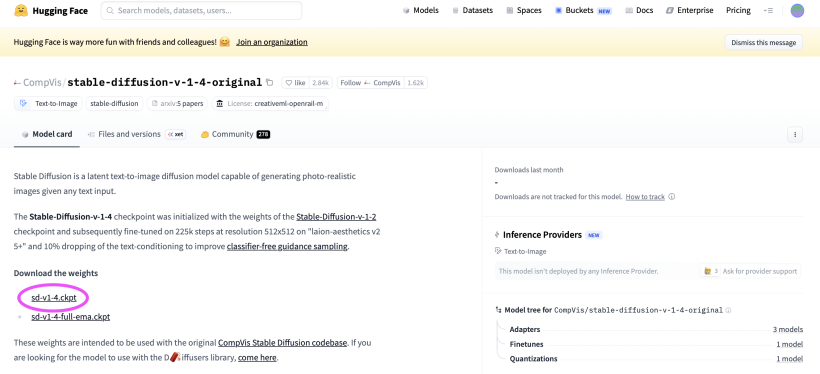
#export STABLE_DIFFUSION_REPO="https://github.com/w-e-w/stablediffusion.git"3.4.4 Download checkpoint sd-v1-4.ckpt von HuggingFace and put the file in folder: StableDiffusion/stabeldiffusionwebuimaster/models/Stable-diffusion/.
3.4.5 Download the Arduino IDE.
4. Step by Step Instructions
#4.1 Activate API, opens URL and activates MPS (Apple GPU)
4.1.1 Finder: Go to your Stabel Diffusion folder 4.1.2 Right-click on folder stable diffusion webui master 4.1.3 Click new terminal at folder 4.1.4 Copy paste command into terminal window:
python3 launch.py --api --skip-torch-cuda-test --no-half4.1.5 Local API opens in browser window: try to enter any prompt and click generate.
Info
When the program starts, PyTorch checks whether NVIDIA GPU (Graphics processing unit) acceleration (CUDA technology) is available. For Apple M1/M2/M3 it is not available that is why we skip-torch-cuda-test.
| System | GPU-Technology | torch.cuda | torch.mps |
|---|---|---|---|
| M1/M2/M3 16GB | MPS (Metal) > CPU & GPU share same memory | x | yes |
| Intel Mac | Keine/ CPU | x | yes |
| Windows + NVIDIA | CUDA | yes | x |
#4.2 Arduino Set-up
4.2.1 Prototype your circuit with Arduino, breadboard and sensor (e.g. a light sensor), upload your analogRead() code and check your values in the Serial Monitor.
void setup() {
  Serial.begin(9600);
}

void loop() {
  int sensorValue = analogRead(A0); // Sensor connected to A0
  Serial.println(sensorValue);
  delay(500); // every 0,5 seconds
}
4.2.2 Then close the Arduino IDE to disconnect the serial connection of your USB port from Arduino to be able to connect with Python in the next steps.
#4.3 Example Python Script for Threshold
This Python code sends your prompt to Stable Diffusion when a threshold (a certain sensor value) is reached. The trigger can be activated again when the value crosses the threshold once more.
In detail: the following Python code prompts “cat climbing a tree” once if the sensor value is below 600.
4.3.1 Right click on Python 3.10 folder (user/programs/Pyton3.10) and click new terminal at folder 4.3.2 Copy paste the following command to the terminal window:
python3 -m pip install pyserial requests4.3.3 Now open Python 3.10 IDLE (program) in applications and copy paste the following example code.
import serial
import requests
import base64
from PIL import Image
from io import BytesIO
import time

# -----------------------------
# CONFIGURATION
# -----------------------------
arduino_port = "/dev/tty.usbmodem112201"  # <--- Adjust to your Arduino port!
baud_rate = 9600
sd_url = "http://127.0.0.1:7860/sdapi/v1/txt2img"
threshold = 600  # Threshold value <--- Adjust threshold value!

# Connect to Arduino
arduino = serial.Serial(arduino_port, baud_rate, timeout=1)
time.sleep(2)
print("✅ Connected to Arduino")

# Track state so prompt is triggered only once
triggered = False

# -----------------------------
# FUNCTION: Call Stable Diffusion
# -----------------------------
def generate_image(prompt: str):
    print(f"🖼️  Sending prompt to Stable Diffusion: {prompt}")
    payload = {
        "prompt": prompt,
        "steps": 20,
        "width": 512,
        "height": 512
    }
    response = requests.post(sd_url, json=payload)
    result = response.json()

    # Base64 → save image
    image_base64 = result["images"][0]
    image = Image.open(BytesIO(base64.b64decode(image_base64)))
    filename = f"generated_images/generated_{int(time.time())}.png"
    image.save(filename)    # <-- Folder "generated_images" or adjust
    print(f"✅ New image saved: {filename}")

# -----------------------------
# MAIN LOOP
# -----------------------------
print("📡 Waiting for sensor values...")

while True:
    try:
        line = arduino.readline().decode().strip()
        if not line:
            continue
        if line.isdigit():
            sensor_value = int(line)
            print(f"Sensor value: {sensor_value}")

            # If below 600 and not yet triggered → send prompt once
            if sensor_value < threshold and not triggered:
                generate_image("cat climbing a tree")
                triggered = True

            # If above 600 again → reset (can be triggered again)
            elif sensor_value >= threshold and triggered:
                triggered = False

        time.sleep(0.1)

    except KeyboardInterrupt:
        print("🚪 Exiting.")
        break
    except Exception as e:
        print("❌ Error:", e)
        time.sleep(1)
4.3.4 Adjust the necessary parameters:
Note: Adjusting parameters in python code
-> adjust your Arduino Port (see Tipp below)
-> adjust your sensor value threshold
-> adjust foldername for generating filename if necessary Filename=
-> adjust your prompt "cat climbing a tree"
Tipp: To see your port list type in terminal and a list of your port devices will appear.
ls /dev/tty.*4.3.5 Save the code to threshold folder. If you haven't already, create the "generated_images" folder there.
4.3.6 Right click on threshold folder, click new terminal tab at folder:
python3 threshold.py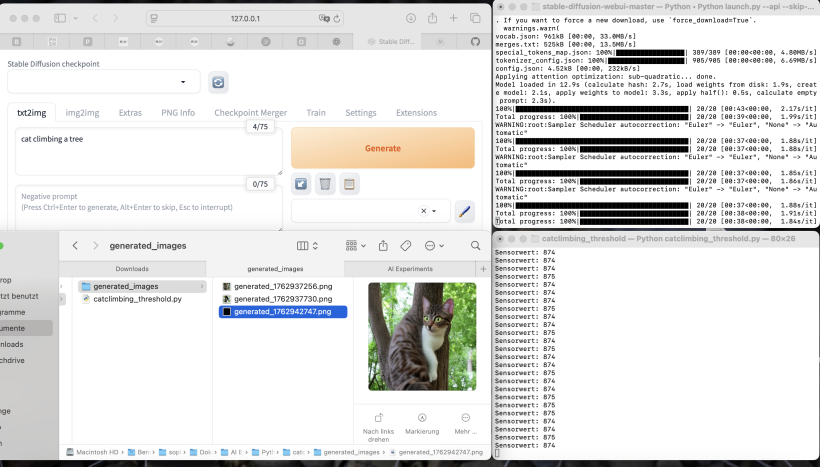
5. Further explorations
#5.1 Project Idea 1: Light atmosphere to image
To get closer to the effect of actually prompting changes of the physical environment, one could, for example, assign three different brightness ranges to a single prompt. This way, a different lighting atmosphere is generated depending on the range:
value < 300: cat climbing a tree at night, low light, dark atmosphere
value < 600: _cat climbing a tree in soft evening light, warm colors
all other values: cat climbing a tree in bright daylight, vivid colors
import serial
import requests
import base64
from PIL import Image
from io import BytesIO
import time
import os
import matplotlib.pyplot as plt

# -------------------------------------------------
# Arduino → Stable Diffusion Trigger mit Helligkeit
# -------------------------------------------------

arduino_port = "/dev/tty.usbmodem112201"  # <- Deinen Port anpassen!
baud_rate = 9600
sd_url = "http://127.0.0.1:7860/sdapi/v1/txt2img"
threshold = 700  # Startschwelle
measure_duration = 5  # Sekunden messen

os.makedirs("generated_images", exist_ok=True)

arduino = serial.Serial(arduino_port, baud_rate, timeout=1)
time.sleep(2)
print("✅ Verbindung mit Arduino hergestellt.")


triggered = False

def generate_image(prompt: str):
    print(f"🖼️  Generiere Bild mit Prompt: {prompt}")
    payload = {
        "prompt": prompt,
        "steps": 20,
        "width": 512,
        "height": 512
    }
    response = requests.post(sd_url, json=payload)
    result = response.json()

    image_base64 = result["images"][0]
    image = Image.open(BytesIO(base64.b64decode(image_base64)))
    filename = f"generated_images/generated_{int(time.time())}.png"
    image.save(filename)
    print(f"✅ Neues Bild gespeichert: {filename}")

def map_brightness_to_text(value):
    """Mappt Helligkeitswert (0–1023) zu Textbeschreibung"""
    if value < 300:
        return "at night, low light, dark atmosphere"
    elif value < 600:
        return "in soft evening light, warm colors"
    else:
        return "in bright daylight, vivid colors"

print("📡 Warte auf Sensorwerte...")

while True:
    try:
        line = arduino.readline().decode().strip()
        if not line:
            continue
        if not line.isdigit():
            continue

        sensor_value = int(line)
        print(f"Sensorwert: {sensor_value}")

        if sensor_value < threshold and not triggered:
            print("📉 Wert unter 700 – starte 5 Sekunden Messphase...")
            triggered = True

            values = []
            start_time = time.time()
            while time.time() - start_time < measure_duration:
                line = arduino.readline().decode().strip()
                if line.isdigit():
                    values.append(int(line))
                time.sleep(0.05)


            if values:
                avg_value = sum(values) / len(values)
                print(f"📊 Durchschnittliche Helligkeit: {avg_value:.2f}")
                lighting_text = map_brightness_to_text(avg_value)
                final_prompt = f"cat climbing a tree, {lighting_text}"
                generate_image(final_prompt)

                # === Plot erstellen und automatisch speichern ===
                plt.figure()
                plt.plot(values, marker='o', label='Helligkeit')
                plt.axhline(avg_value, color='r', linestyle='--', label=f'Durchschnitt: {avg_value:.1f}')
                plt.title("Sensorwerte in 5 Sekunden")
                plt.xlabel("Messung")
                plt.ylabel("Helligkeit")
                plt.legend()
                plt.tight_layout()

                # Dateiname für Plot
                plot_filename = f"generated_images/plot_{int(time.time())}.png"
                plt.savefig(plot_filename)  # Speichern im Ordner
                plt.close()                 # Schließt die Figur sofort, kein Blockieren
                print(f"✅ Plot gespeichert: {plot_filename}")
            else:
                print("⚠️ Keine gültigen Werte während Messung erhalten.")

        elif sensor_value >= threshold and triggered:
            triggered = False

        time.sleep(0.1)

    except KeyboardInterrupt:
        print("🚪 Beendet durch Benutzer.")
        break
    except Exception as e:
        print("❌ Fehler:", e)
        time.sleep(1)
#5.2 Project Idea 2: Stretch to Image to Image
Co-design with AI: let Stable Diffusion rework an image you sketched or painted through interacting with a textile stretch sensor.
import serial
import requests
import base64
from PIL import Image
from io import BytesIO
import time
import os
import matplotlib.pyplot as plt

# -------------------------------------------------
# Arduino → Stable Diffusion IMG2IMG mit Stretch-Sensor
# -------------------------------------------------

arduino_port = "/dev/tty.usbmodem12301"  # <- Deinen Port anpassen!
baud_rate = 9600
sd_url = "http://127.0.0.1:7860/sdapi/v1/img2img"
threshold = 300
measure_duration = 5

input_image_path = "input/input.png"   # <<=== Dein Ausgangsbild
os.makedirs("generated_images", exist_ok=True)

arduino = serial.Serial(arduino_port, baud_rate, timeout=1)
time.sleep(2)
print("✅ Verbindung mit Arduino hergestellt.")


triggered = False

# -------------------------------------------------
# Bild lesen und in Base64 konvertieren
# -------------------------------------------------
def load_image_base64(path):
    with open(path, "rb") as f:
        return base64.b64encode(f.read()).decode("utf-8")


# -------------------------------------------------
# IMG2IMG Bildgenerierung
# -------------------------------------------------
def generate_img2img(prompt: str, denoise=0.55):
    print(f"🖼️  IMG2IMG mit Prompt: {prompt}")

    init_image_b64 = load_image_base64(input_image_path)

    payload = {
        "init_images": [init_image_b64],
        "prompt": prompt,
        "denoising_strength": denoise,
        "steps": 25,
        "width": 512,
        "height": 512
    }

    response = requests.post(sd_url, json=payload)
    result = response.json()

    image_base64 = result["images"][0]
    image = Image.open(BytesIO(base64.b64decode(image_base64)))

    filename = f"generated_images/img2img_{int(time.time())}.png"
    image.save(filename)
    print(f"✅ IMG2IMG Ergebnis gespeichert: {filename}")


# -------------------------------------------------
# Mapping wie von dir gewünscht
# -------------------------------------------------
def map_sensor_to_prompt(value):
    if value < 210:
        return "stretching and twisting"
    elif value > 210:
        return "soft and fluffy"
    else:
        return "neutral transition"


print("📡 Warte auf Sensorwerte...")

while True:
    try:
        line = arduino.readline().decode().strip()
        if not line:
            continue
        if not line.isdigit():
            continue

        sensor_value = int(line)
        print(f"Sensorwert: {sensor_value}")

        if sensor_value < threshold and not triggered:
            print("📉 Wert unter threshold – starte 5 Sekunden Messphase...")
            triggered = True

            values = []
            start_time = time.time()
            while time.time() - start_time < measure_duration:
                line = arduino.readline().decode().strip()
                if line.isdigit():
                    values.append(int(line))
                time.sleep(0.05)

            if values:
                avg_value = sum(values) / len(values)
                print(f"📊 Durchschnittlicher Sensorwert: {avg_value:.2f}")

                prompt = map_sensor_to_prompt(avg_value)
                generate_img2img(prompt)

                plt.figure()
                plt.plot(values, marker='o', label='Sensorwerte')
                plt.axhline(avg_value, color='r', linestyle='--',
                            label=f'Durchschnitt: {avg_value:.1f}')
                plt.title("Sensorwerte in 5 Sekunden")
                plt.xlabel("Messung")
                plt.ylabel("Sensorwert")
                plt.legend()
                plt.tight_layout()

                plot_filename = f"generated_images/plot_{int(time.time())}.png"
                plt.savefig(plot_filename)
                plt.close()
                print(f"📈 Plot gespeichert: {plot_filename}")

            else:
                print("⚠️ Keine gültigen Sensorwerte erhalten.")

        elif sensor_value >= threshold and triggered:
            triggered = False

        time.sleep(0.1)

    except KeyboardInterrupt:
        print("🚪 Abbruch durch Benutzer.")
        break
    except Exception as e:
        print("❌ Fehler:", e)
        time.sleep(1)
#5.3 Project Idea 3: Now it is your turn!
6. Related Links:
- Another guide on how to install on Apple Silicon
- How to Stable Diffusion
- Promting Guide